DIY Dog Leash with Rope: A Quick Tutorial for Crafting a Durable Leash
Creating your own DIY dog leash with rope is not only a fun project, but it’s also an incredibly practical way to customize your pet’s gear. Whether you’re looking to save money, have a say in the quality of the materials used, or simply enjoy the satisfaction of making something for your dog, this quick tutorial will walk you through the steps of crafting a sturdy, stylish leash that you can be proud of.
Why DIY Dog Leash with Rope?
There are many reasons why making your own dog leash with rope is a fantastic idea. First and foremost, it gives you full control over the leash’s length, strength, and overall style. You can select materials that suit your dog’s size and temperament, ensuring they have a leash that fits perfectly for walks, training, or outdoor adventures.
Additionally, creating a leash yourself allows for complete customization. Choose colors and patterns that reflect your pet’s personality or your own preferences. Plus, you can easily make multiple leashes to match different occasions or seasons! DIY dog leashes are also a more affordable option compared to buying pre-made leashes from pet stores, and they allow you to create something truly unique.
Before diving into the tutorial, let’s take a look at the materials you’ll need for this DIY dog leash project.
Materials Needed for Your Dog Leash
To get started, gather the following materials for your DIY dog leash with rope:
- Rope: A durable, strong rope is essential for a leash that will hold up to daily walks. We recommend a 3/8 inch thick rope. For a standard 5-foot leash, you’ll need about 6 feet of rope.
- Snap Hook: This will attach the leash to your dog’s collar securely. You can find sturdy snap hooks in most hardware stores or online.
- Strong Thread: Use a high-quality thread that can handle the pressure of daily use. Look for thread that’s designed for heavy-duty stitching.
- Paracord (Optional): Paracord is great for added durability and aesthetics. It can be used to reinforce your leash, especially the stitching.
- Scissors: Sharp scissors are necessary for cutting the rope and paracord to the desired length.
- Lighter: A lighter is needed to seal the ends of the rope and prevent fraying.
Step 1: Cutting the Rope
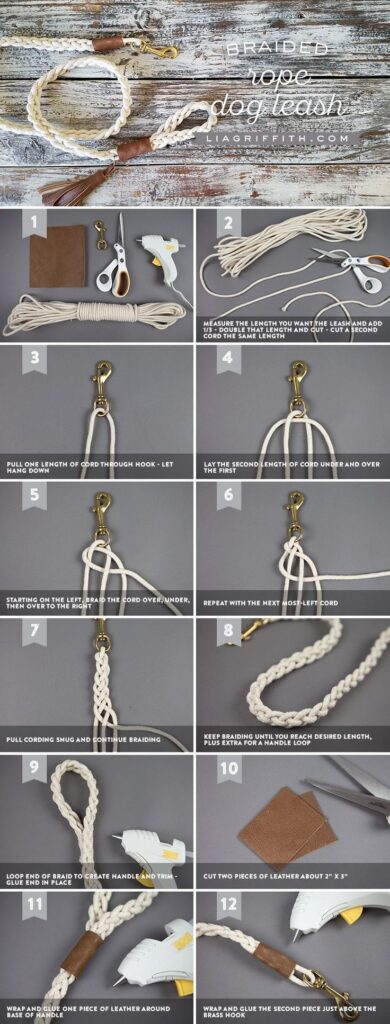
The first step in making your dog leash with rope is to cut your rope to the desired length. As mentioned earlier, the general recommendation is to add one extra foot to the length of the leash you want. So, if you’re aiming for a 5-foot leash, cut the rope to 6 feet. This extra length will come in handy for tying knots and creating loops.
To cut the rope, use a pair of sharp scissors to ensure a clean, precise cut. If you’re using a thicker rope, you may want to use a utility knife for a smoother finish.
Step 2: Sealing the Ends of the Rope
Once the rope is cut to your desired length, it’s time to seal the ends to prevent fraying. This is an important step to ensure the longevity of your leash.
To do this, take a lighter and gently hold the flame near the end of the rope. The heat will cause the fibers to melt and bond together, creating a seal. Be careful not to overheat the rope, as you don’t want to burn it. This process only takes a few seconds and will ensure that your leash remains intact and durable for long-term use.
Step 3: Attaching the Snap Hook
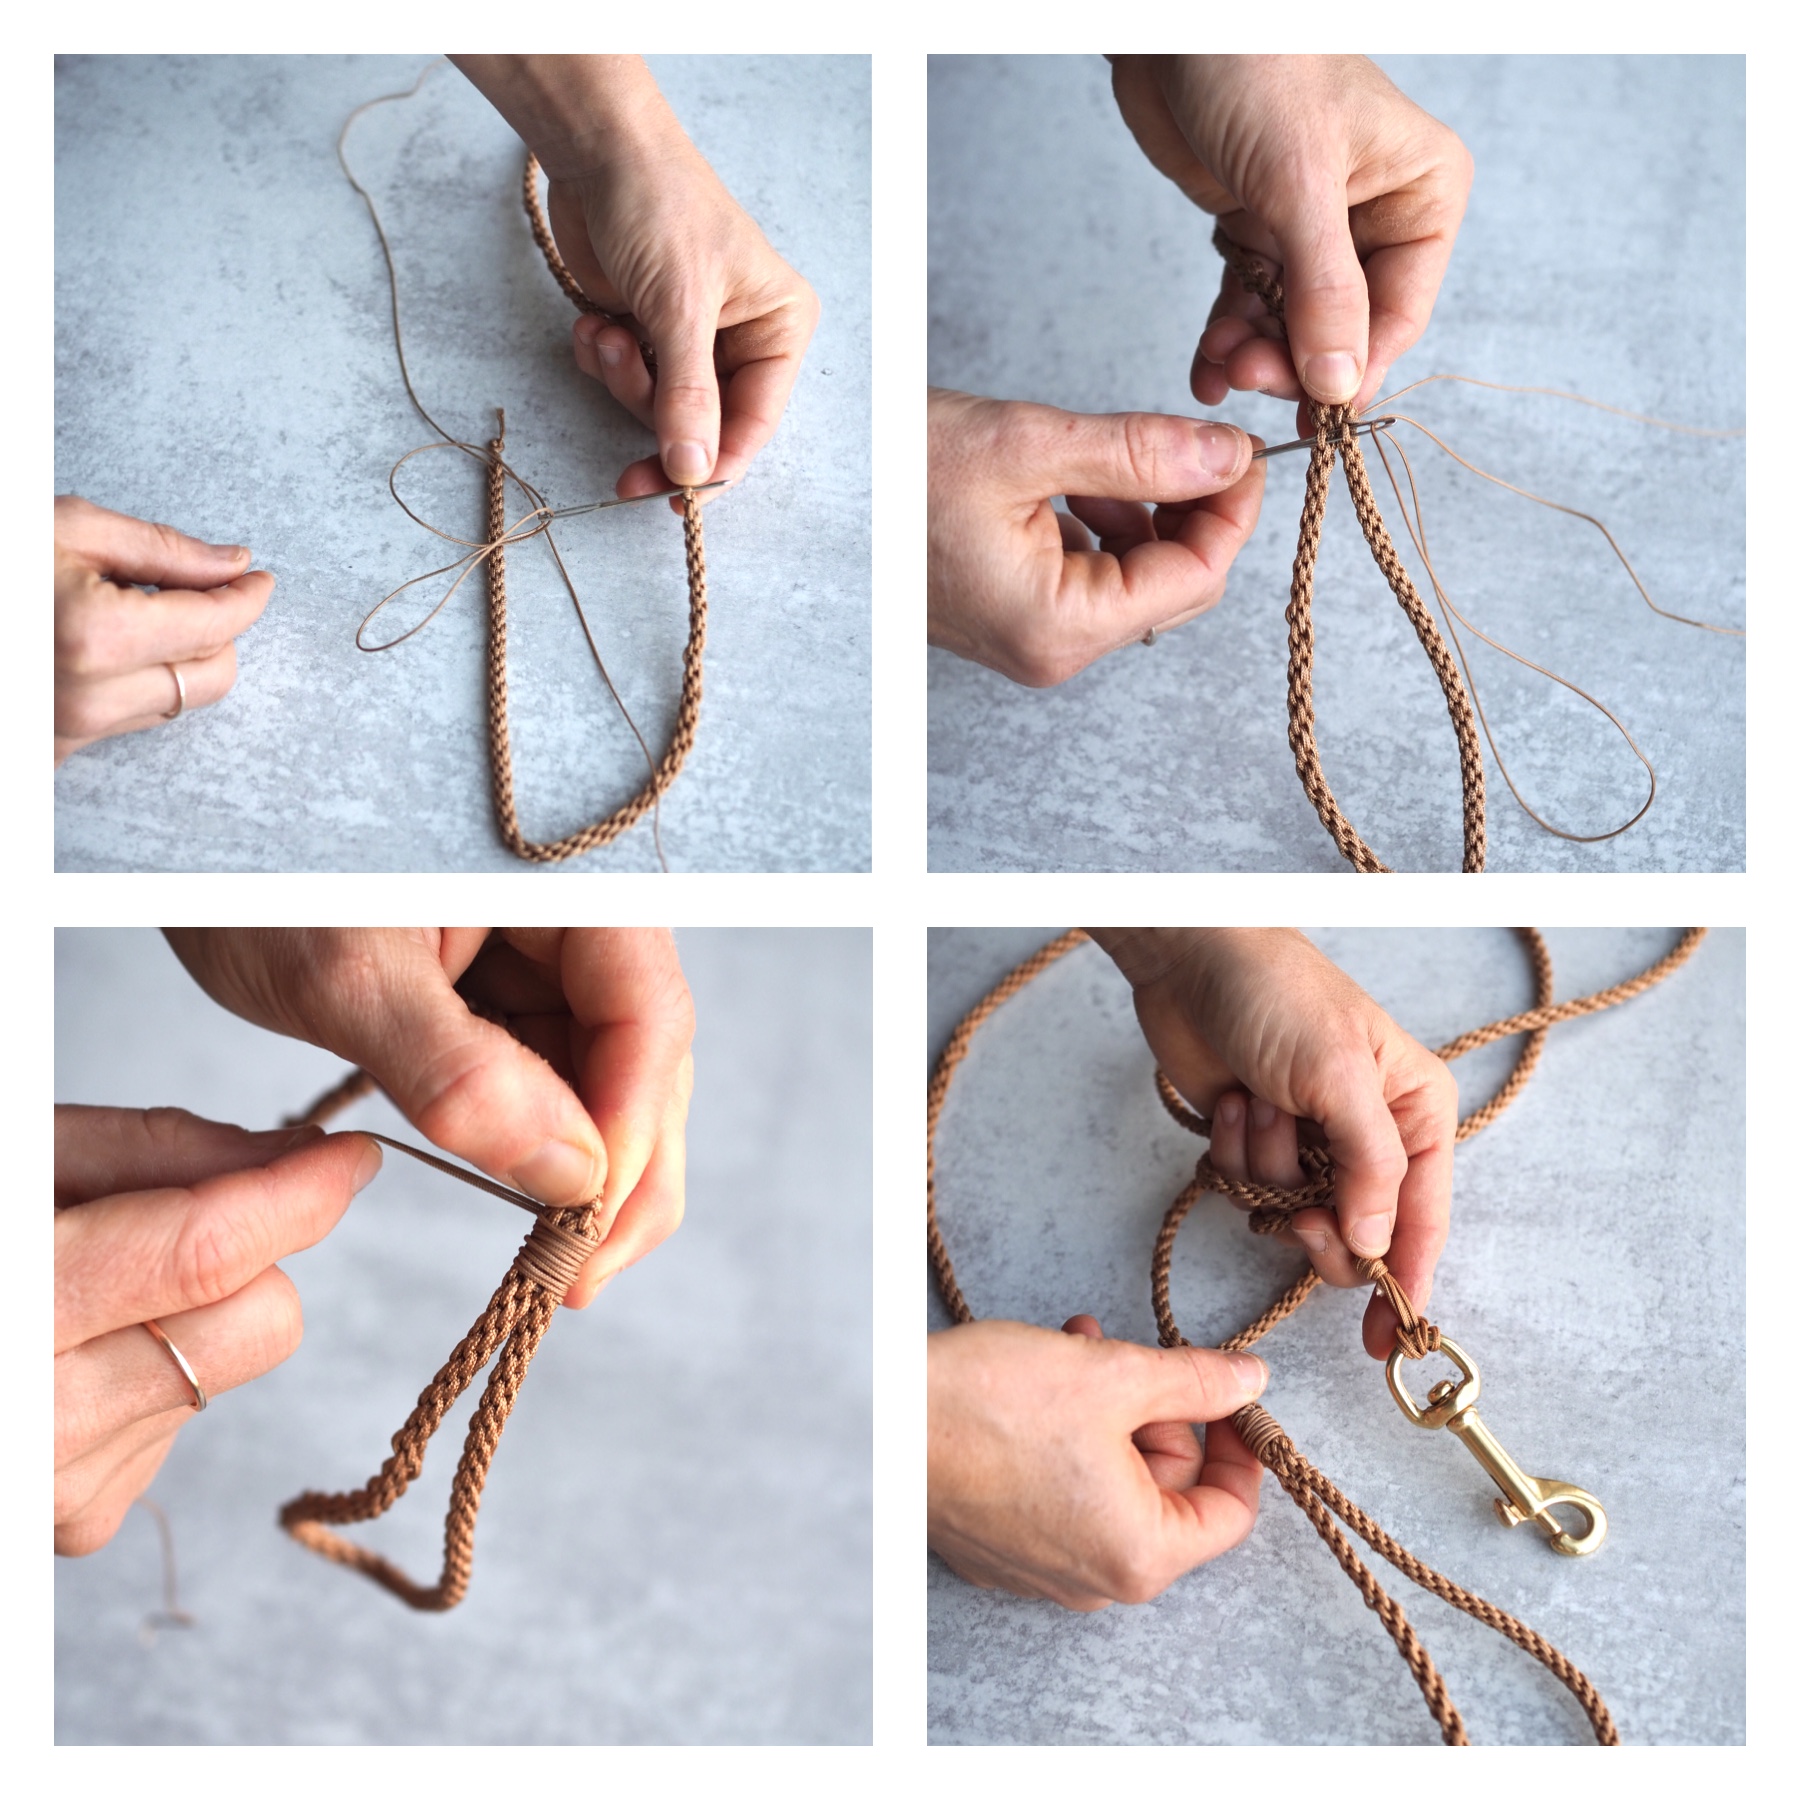
Next, it’s time to attach the snap hook to your leash. Start by creating a loop at one end of the rope. You can do this by folding the rope back onto itself and stitching it securely.
Using your strong thread, sew the snap hook into the loop. It’s crucial to make sure the stitching is tight and secure, as the snap hook will bear the weight of your dog during walks. Go over the stitching a couple of times to ensure maximum strength.
If you’re feeling extra crafty, you can use paracord to wrap around the stitching for added durability and a more polished look.
Step 4: Creating the Handle Loop
At the other end of the leash, you’ll need to create a handle loop. This loop is what you’ll use to hold the leash while walking your dog. There are a few options for how to create this loop, but we recommend the simplest and most effective method: folding the rope back onto itself.
To make the loop, fold the rope back on itself to create a comfortable-sized handle. You can adjust the size of the loop based on your preference—just make sure it’s big enough to comfortably fit your hand.
Once the loop is formed, sew it securely with strong thread. Again, you can use paracord to reinforce the stitching if you’d like to add a little extra flair and strength.

Step 5: Seizing (Optional Step)
If you want to make your leash extra durable and stylish, you can add a finishing touch by using paracord seizing. This technique involves wrapping paracord around the stitched areas of your leash for extra strength. It also gives your leash a more professional, crafted look.
To do this, simply take a length of paracord and wrap it tightly around the stitching at both the snap hook end and the handle loop end. Once the paracord is wrapped around, tie it off securely. You can even experiment with different colors of paracord to add a pop of personality to your leash.
This step is optional, but it can certainly add an extra layer of durability and visual appeal to your custom leash.
Final Touches: Customizing Your Leash
Now that your DIY dog leash with rope is almost complete, it’s time for the final touches. This is where you can get creative and personalize your leash to suit your dog’s style.
- Trim any excess rope: If there’s any leftover rope hanging from the knots or loops, simply trim it off to give your leash a clean and finished look.
- Customize with leather or paint: For a more personalized touch, you can add leather accents, such as a leather handle or decorative strips, to your leash. Alternatively, you could paint the rope with fabric or leather paint to match your dog’s personality or your own style.
Remember, this leash is something you’ve made with your own hands, so feel free to get creative with the design!

Tips for a Perfect DIY Leash
Before using your dog leash with rope, it’s essential to test its strength. Here are a few tips to ensure everything is secure:
- Test the snap hook: Before attaching the leash to your dog, give the snap hook a gentle pull to ensure it’s firmly stitched.
- Check the handle loop: Make sure the handle loop is large enough to comfortably fit your hand, and that the stitching is tight.
- Inspect for any weak spots: Go over the leash carefully, checking for any loose threads or weak areas. If needed, reinforce those spots with additional stitches or paracord.
By following these tips, you’ll ensure that your leash is not only functional but also strong enough for everyday use.
Stay tuned for the second half of this guide, where we’ll go over more creative ways to personalize your leash and additional DIY dog leash tips. You’re only a few steps away from having a custom leash that’s perfect for your furry friend!
Final Touches: Customizing Your Leash
Now that you’ve completed the core steps of creating your DIY dog leash with rope, it’s time for the fun part – customizing it to match your personal style and your dog’s personality. This is where your creativity can shine. Whether you want to make it a simple yet sleek leash or add decorative elements to make it stand out, here are some ideas to personalize your leash:
Add Leather Accents: If you’re looking for a sophisticated, high-end look, consider adding leather accents to your leash. A leather handle, for example, not only enhances the aesthetic but also provides added comfort when holding the leash. You can attach small leather strips to the rope or even use leather stitching for an elegant touch.
Paint the Rope: For those who enjoy a splash of color, fabric paints or leather paints are a great option. You can use these paints to create custom designs, patterns, or even your dog’s name along the leash. Not only will this make the leash uniquely yours, but it’s also a fun way to express your pet’s personality!
Add Decorative Beads or Charms: Enhance the visual appeal of your leash by adding decorative beads or charms. You can string beads onto the rope at different intervals, or attach charms like paw prints, hearts, or dog-related motifs. This adds a playful touch and makes the leash stand out even more.
Experiment with Different Ropes and Colors: Another fun way to customize your leash is by experimenting with different types of ropes and colors. Try mixing different textures or materials like nylon, cotton, or hemp ropes for a unique look. You can also alternate between colors or add a multicolored design to give it more flair. Your dog will surely appreciate the stylish walk with a leash made just for them!

Tips for a Perfect DIY Leash
Before using your newly crafted leash, take the time to ensure it’s both functional and safe for your dog. Here are some important tips to keep in mind:
Test the Snap Hook: It’s essential to make sure the snap hook is securely attached to the rope. Gently tug on the snap hook before using the leash with your dog to ensure it won’t detach under pressure. If necessary, reinforce the stitching with extra thread or paracord for added security.
Check the Handle for Comfort: Try holding the handle of the leash to ensure it’s comfortable for your hand. You want the handle loop to be large enough to fit your hand comfortably without being too loose. If the loop is too small, it may cause discomfort during walks, so make sure it’s just right.
Reinforce Weak Spots: If you find any weak spots in your leash—especially near the knots or stitching—reinforce them. Consider adding extra paracord or additional stitches in areas where the leash might experience the most tension. This will ensure your leash stays intact for years to come.
Inspect for Fraying: After several uses, check the ends of the rope and stitching for signs of wear and tear. If the ends start to fray, carefully seal them again with the lighter or trim them off and reseal.
Frequently Asked Questions (FAQs)
Q: How long should the rope be for a DIY dog leash?
A: The length of the rope depends on how long you want the leash to be. As a general rule, add one foot to the desired leash length. For example, if you want a 5-foot leash, you should cut the rope to 6 feet.
Q: Can I use any type of rope for the leash?
A: It’s best to use a durable, strong rope like hemp, cotton, or nylon that can handle the pressure of daily walks. Make sure the rope is at least 3/8 inch thick for strength.
Q: What if I don’t have a snap hook? Can I use something else?
A: While a snap hook is ideal, you can also use other types of dog leash clips or even make a loop out of the rope itself. However, a snap hook is highly recommended for easy attachment to your dog’s collar.
Q: How do I keep my DIY leash from fraying?
A: The best way to prevent fraying is to seal the ends of the rope with a lighter to melt the fibers and bind them together. This creates a long-lasting, fray-resistant finish.
Additional DIY Dog Leash Tips
Customize the Leash Length: While most leashes are 4-6 feet long, you can customize the length based on your needs. For training purposes, a shorter leash (2-3 feet) may be more appropriate, while a longer leash (7-8 feet) can be ideal for those who want more freedom during walks.
Consider Adding a Second Handle: If you’re using the leash for training or need more control over your dog, you can add a second handle partway down the leash. This gives you a shorter portion of the leash for better control when needed.
Match the Leash with a Collar: For a coordinated look, create a matching DIY collar using the same rope or design elements. A matching collar and leash set will make your pet the talk of the dog park!
Care for Your Leash: To ensure your leash lasts for many walks, be sure to regularly check for signs of wear and tear, especially if you use it frequently in outdoor environments. Clean it as needed and replace any worn parts promptly.
Conclusion: Enjoy Your Custom-Made Leash
Making your own DIY dog leash with rope is a rewarding and satisfying project that allows you to create a durable, customized leash for your furry friend. Not only will you save money compared to store-bought options, but you’ll also have the satisfaction of knowing you crafted a leash tailored to your dog’s needs and style.
Whether you’re looking for a basic leash or one with added personality, this quick tutorial gives you the flexibility to create a leash that’s perfect for both you and your dog. Customize it with different colors, patterns, or decorative elements, and enjoy every walk with your unique, hand-crafted leash!

For more DIY dog leash tutorials, tips, and pet supplies reviews, be sure to check out other helpful guides on MyTopDeals10.com. We offer insightful reviews, exclusive discount codes, and great product recommendations to make your life easier and help you find the best deals online. Whether you’re looking for AI tools, home essentials, or pet supplies, we have you covered with the latest and greatest products.
Ready to create your own leash? Follow the tutorial and grab your materials today!
https://i.pinimg.com/736x/c7/e8/4f/c7e84fbf35677efd9f9ff8a2327e6154.jpg


